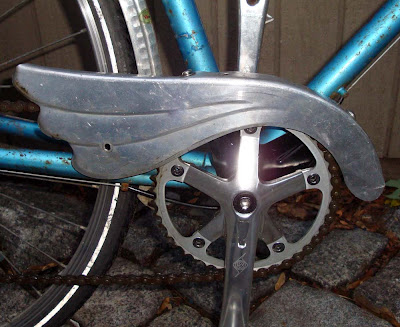
The new bottom bracket required new cranks, something I wasn't thrilled about, but it all works flawlessly now. Perhaps someday I will find prettier cranks with the correct taper.
It's worth noting that, while we could have installed the cartridge ourselves, removing the old cups from the old-fashioned bottom bracket was not something we could do ourselves. Shops have expensive specialized tools to complete the task quickly and efficiently. My second-favorite mechanic on earth (I'm not married to you, J) did all of this for less money than the one-month bus pass I would have had to buy while we fought with the bike. In other words, money well spent.
As part of the repair we brought in the hack-sawed SKS chainguard bracket which he put on when installing the cartridge. It was originally 3-armed and we removed one to leave just two mounting points for the chainguard. This modification allowed me to install my pretty French chainguard!

It would probably look better with a larger chainring but this is the size calculated to be ideal for Step Two of the drivetrain overhaul, internal 3-speed hub. My husband finished the wheel last night, so that's happening soon. You can see that the modern cranks are a little, uh, robust, beefy, for the vintage bike, but they do work well.

I had to drill a new hole in the chainguard to match the bracket. It was easy to do. The bracket is threaded, so I haven't added the nuts to the screws yet. I will do that this weekend as I now have it positioned just right.
 Here you can see how the chopped SKS chainguard mount holds the chainguard without touching my frame. It's clamped on by the bottom bracket. I like that there will be no cause for more rust than I already have...
SKS, I know you're not reading but if you were I think this would be a natural product to offer. So many people struggle with mounting a custom chainguard, why don't you offer a vintage chainguard kit?
I've been riding with it for a week now and it's been great. I feel like my bike has new jewelry, and my trousers have been protected. The new bottom bracket is a more subtle upgrade, but it does make the bike feel stronger, smoother, and thus safer. I'm a very happy cyclist.

10 comments:
It's not the size of the ring (the one on the original may well have been a bit smaller than that even), but that the guard is mounted too far forward.
Yeah, you're probably right. With this mounting strategy I can't move it any further back.
If I had a larger ring it wouldn't be too far forward...
Can you tell us where you got the SKS chainguard bracket? Is that a standard item?
I have one of the older Velo Orange chrome chainguards sitting in my workshop, waiting for me to figure out how to install it, and I like this idea.
I also saw that VO has a new chainguard, albeit a bit too thin for my tastes. If there's going to be a guard at all, it's gonna keep my pants nice and neat.
and how hard is it to build a wheel? maybe a question for you husband? sounds like a nice winter project!
-geoff
jpbikeresearch.com
Geoff, I agree with you that the VO chainguard is too thin. Their bracket does look better the SKS one I used, it looks like it would allow for more positioning.
My bracket was not a standard item. It was from a broken chainguard at Harris, it had been sitting in back and they thought of it for my project. I did have to take a hacksaw to it. Bikes Not Bombs also has a shop-worn SKS chainguard in the cheap used-parts bin, though it's the larger size.
How hard is it to build a wheel? There is skill involved, and patience, but it's not rocket science. It's more an art. The class at Bikes Not Bombs was a perfect winter activity, it was worth it.
Here in MPLS, the guy at Nokomis Cycle will unstick your Bottom Bracket Cups for $10. It's phenomenal.
Very cool, The chainguard looks awesome.
What sort of bottom bracket did you use? All of my raleighs have the standard setup with cotttered cranks etc. I have not had to do the upgrade, but I have done a bit of reading on Sheldon's (RIP) site over the years and always wondered what was involved.
RB
http://townandcountrybiker.wordpress.com
RB,
Mine is a Sugino, but there are so many makes and I think they all work about the same.
It was pretty painless, except for getting new cranks, which is what you'd get to/have to do too.
I feel much better about winter arriving now.
Ah, the new crank conundrum...
I finally got my bottom bracket replaced last year, there was only so much packing and messing that could be done to the old worn out one. Because of the odd threading and width I had to order one from England. Even with shipping, half the cost of a Phil Wood.
I can't really tell because of the totally enclosed chain case on my bike, but I'm a bit worried about the chainring's "dental health". The mechanic who last had it off said the teeth were a little rounded, but it was OK, and that I should baby it, because if I were to have to replace it, finding a set of cranks with spiders that would fit inside the chain case would be nearly impossible.
I love love love my full chain guard though, I don't understand why more bikes don't/ didn't have them.
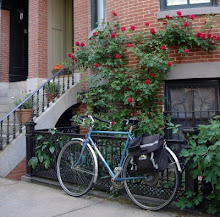
Though it seems like all the changes you had to make were a bit daunting, the result is very nice. Do you have a more zoomed-out photo showing how the whole bike looks with the new addition?
I came across this new wheel set at VO: http://www.velo-orange.com/star8singewh.html
This has me thinking that I may convert my Grand Prix over to 3 speed.
Would love to see any updates on the 3 speed progress on your Dawes.
Cheers,
RB
Post a Comment