
OK, so I've secretly been on vacation the last week, with the blog auto-publishing. I'm back now and so rested and happy. So happy, indeed, that we finished the wine box, though there will continue to be tweaking for the foreseeable future.
We decided that the best way to attach it is with four individually tensioned bungee cords. We drilled holes in the box and passed the elastic cording through and tied a knot. It was that easy! It doesn't seem to move forward and back, but I'm in the process of testing how reliable that is. The hardware store didn't have the clip I wanted so this test is one of necessity. So far I've carried about twenty-five pounds in it. The steering gets a bit squirrely with that much weight up high, but that's to be expected. The box itself works great.

The best part is that I don't have to unload the box. I just unhook the bungees and carry the whole thing up my crazy stairs to the apartment. It couldn't be easier!
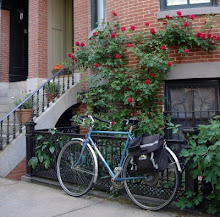
Update for Melissa: Here you can see a close-up of how it attaches. I covered the raw ends of the bungee with electrical tape so that's the black strips on the tan bungees.

8 comments:
It looks great.... aclassic. Good luck with your testing.
Can you show exactly where the holes were drilled and how they hook up? From that picture, I see no holes, so I can only assume that they are in the bottom of the box. However, as someone trying different methods of hooking my own crate up, I'd be interested in exactly how it's easy to unhook the bungees and take it upstairs (anytime I've used bungees, it's been a PITA, because they get stuck everywhere when trying to unwind them from my back rack).
Thanks!
That is eight different shades of awesome. It seems so convenient! Have you got any comments on it yet?
Melissa,
The bungee is indeed subtle, as I intended. It is the light tan line(s). They were kept intentionally short to avoid the tangle issue (and because they need to be short to be tensioned enough). The holes are in the bottom of the box. The first set are right in front, only back enough to be structurally sound in the wood. The second set are just at the level where the rack ends, so that all the pressure they generate goes entirely on the rack. I got the bungee cording from a fabric store ($0.99/yard) and tied knots rather than using hooks. This also helps to avoid the tangle problem. I'll get more photos for you when I get it out again on Thursday.
Krista and Tom - thanks so much! No comments yet (except for here).
Aha! That makes much more sense now - I didn't see them at all in the first two pictures. Thanks!
(Also, I feel special for getting a first-name-mention on your highly awesome blog.)
The box looks amazing! I am definitely going to try to copy that... what a great idea. (And thanks for the added info on bungees in the comments...)
Sweet job! Now we need a mail order source for nice wine boxes...around here they come in carboard and the bottles have screw tops LOL
Aaron
Post a Comment